Virginia Home Grown
Green Technology
Season 24 Episode 1 | 56m 46sVideo has Closed Captions
Explore green technology for the home landscape and forest management!
Peggy Singlemann uncovers the history of battery powered lawn care equipment with Jim Coate in Waynesboro. Dr. Robyn Puffenbarger explores Lesesne State Forest to learn how the Virginia Department of Forestry uses modern drone technology. Plus learn about home hydroponic growing. Engage with us or watch full episodes at Facebook.com/VirginiaHomeGrown and vpm.org/vhg. VHG 2401 March 2024.
Problems playing video? | Closed Captioning Feedback
Problems playing video? | Closed Captioning Feedback
Virginia Home Grown is a local public television program presented by VPM
Virginia Home Grown
Green Technology
Season 24 Episode 1 | 56m 46sVideo has Closed Captions
Peggy Singlemann uncovers the history of battery powered lawn care equipment with Jim Coate in Waynesboro. Dr. Robyn Puffenbarger explores Lesesne State Forest to learn how the Virginia Department of Forestry uses modern drone technology. Plus learn about home hydroponic growing. Engage with us or watch full episodes at Facebook.com/VirginiaHomeGrown and vpm.org/vhg. VHG 2401 March 2024.
Problems playing video? | Closed Captioning Feedback
How to Watch Virginia Home Grown
Virginia Home Grown is available to stream on pbs.org and the free PBS App, available on iPhone, Apple TV, Android TV, Android smartphones, Amazon Fire TV, Amazon Fire Tablet, Roku, Samsung Smart TV, and Vizio.
Providing Support for PBS.org
Learn Moreabout PBS online sponsorship>>We sometimes use insect traps, we sometimes go up in small aircrafts, sometimes we use satellite imagery.
And we are excited about incorporating drones into our forest health monitoring work.
>>You can go to a big box store and get a walk-behind push mower that's electric, or you can go the other end if you're a commercial landscaper, and you can get a really nice high-end, all-electric, zero turn mower.
It's this middle size nobody is really doing.
>>Production funding for "Virginia Home Grown" is made possible by The Mary Roper Davis and Robert Poore Roper Memorial Fund and by... (birds tweeting) (lively music) (lively music continues) (lively music continues) (lively music continues) >>With spring in the air and flowers blooming everywhere, I'm happy to say welcome to "Virginia Home Grown!"
We are excited to head into a new season of gardening and growing!
Before we get started, I wanna remind you to send in your gardening questions through our website at vpm.org/vhg.
We'll be answering those a little later.
Today we are highlighting innovations in green technology.
In the second half of our show, we will learn how drones are taking the Virginia Department of Forestry's management of our state forests to new levels.
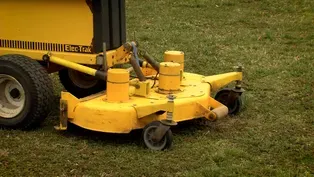
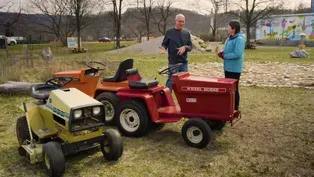
But first, I visited Jim Coate at The Electric Tractor Store in Waynesboro to see his collection of electric mowers and I was surprised to learn that their use in lawn care is not exactly a new idea.
Let's get going.
(engine humming) >>Oh my, hey, Jim, how you doing?
>>Hi, Peggy.
Doing good.
>>Wow, you've got a great new toy here.
It looks kind of old for a new toy, but it's so quiet.
>>Mm-hm.
Well, it actually is old.
It's from the 1970s, and it's quiet because it's all-electric.
>>I've never heard of an electric lawnmower before.
>>So at the time, with the backdrop of the oil crisis going on and the lines at the pumps et al, GE was in a way a little bit of a leader, and they took a risk, started up their outdoor power equipment department and started producing these all-electric garden tractors.
>>My.
>>And they ranged from a small ride-on mower only up to, this was their largest model, which could do the full garden tractor type stuff.
>>Interesting, how long will it last if I were to use this mowing my grass?
You know, how long could I use it before I had to recharge the battery?
>>You can get two or so acres out of it.
>>And how long does it take to recharge?
And being kind of old technology, does it take a long time to recharge the battery?
>>Guess that's all relative.
(Peggy laughs) With the charger that comes with it, if you were fully run down, you could plug it into a regular outlet overnight, and eight hours, 10 hours later, you were good to go.
If you're using it a lot during the day, when I used to live more out in the country, I would plug it in over lunch and give it a boost charge and go back to it after lunch and keep on going.
>>Well, I know they didn't have lithium batteries back then, so I guess these are lead-acid?
>>Right, lead-acid batteries, golf cart batteries of the time and actually still in use today in golf carts.
And they're much simpler.
You don't need all the computer control to use 'em safely like the lithium.
So it's what they had at the time, and in a garden tractor situation, unlike a car on the road, the extra weight of the lead is not such a penalty because if you're tilling or trying to plow or something, you want the weight to get traction.
>>You want some weight, yes.
Yeah, so it works out very well versus the lithiums are so light.
People don't realize that, yeah.
So, Jim, did any of the technology from yesteryear be used as a basis for what's being developed today?
>>A lot of it is totally different because these were DC motors.
Everything is AC motors now, lead-acid.
Everything's lithium now.
But the basics that you have a motor and a controller and batteries, that's been the same.
And yeah, I think that's helped lay the groundwork that somebody had to do that more basic stuff first to get us to where we are today.
>>Were any other companies involved with this, or is it just all GE?
>>GE was the main one, and maybe this gets to your other question too as to what came from their engineering.
It seemed that it possibly inspired a few other models to come out from some of the other companies at the time, ranging from John Deere had a little ride-on.
And I've heard that JC Penney also had one too, so it was coming out in different ways.
>>Oh, that's great.
Well, do you have any of those?
I'd love to see 'em.
>>I do have a couple others.
We could go take a look.
>>Okay, that sounds great.
Well, Jim, you had mentioned earlier that you used the Elec-Trak to mow this area.
So how does it handle on terrain?
>>Well, on this flat space, it does great, no problems, and it also has done well for me when I used to live more around the country and had property with a steep slope down to a little river and could mow going up and down there.
I could also put a trailer behind and bring a load of wood up with me.
>>So they're really versatile.
>>They sure are.
>>Wow, and also there's many different brands I'm seeing.
>>Right, in front here, we have one from Sears, which was the big company back then- >>Absolutely.
>>And their monster catalog.
So they briefly got into the electrics.
And like the yellow one we saw down there, General Electric had a separate line, which is basically the same thing painted industrial orange.
They marketed to factories, and you could get a forklift for it with a roll cage on top.
You could set it up to tow a bunch of carts behind it to move materials around within.
And the whole idea there is as an electric, it is no exhaust, no pollution.
>>Yes, that's very sustainable, very safe too.
And orange is for safety, so that makes sense.
>>Right.
>>Yeah.
And then this red one here from Wheel Horse?
>>Mm-hm, Wheel Horse took over the product line for the last few years, and initially they just put out the exact same thing, paint it in their color red, and then for a short while they took some of their gas models and made electric versions.
>>Let's compare electric versus gas.
How is the torque on these vehicles?
>>Oh, one of the neat thing about electric is it has full torque right when you first start going, which is great for the tractors.
It's also fun as an electric car driver that you step on, and it just starts going.
>>And it goes, yes.
(laughs) And it must be good for the attachments as well, which you had mentioned earlier that they had attachments.
>>Those big ones like the tiller on back or the snow-thrower on the front, all that torque of the motor, it can chew through a snowbank, or it can break up heavy ground.
>>Do you have some attachments here?
I'd love to see 'em.
>>Mm-hm, yeah.
(engine humming) (blade whirring) So, Peggy, they had quite a number of accessories.
I have some of them out here to show you.
>>Oh my, there's more than I thought.
>>I know.
(Peggy laughs) They go on and on.
The plow blade on the front, which was primarily marketed for snow pushing, but I've also done some small amount of dirt grading with it.
>>Right.
>>And on the back, they had a decent-sized tiller that had a lot of power to it.
>>Very ingenious, but that's what I was anticipating.
I was not anticipating everything else.
>>Mm-hm.
>>Yeah.
>>What they also did is at the time, they'd come out with a line of corded tools that you'd plug into a 110-volt outlet.
And what they did is they turned a lot of them into 36-volt versions that would run off of the tractor.
So instead of your corded drill, you, from your outlet, you would plug into the tractor.
>>Nice.
>>And you had a drill wherever you could drive your tractor.
You could also have a chainsaw that would come along with you.
And kind of a companion to that big tiller on the back was this small tiller to do just little spaces within your garden.
>>My kind of tool.
>>There you go.
>>Great little weeder, yes.
>>And this was before weed whackers were all the rage.
>>Oh, (laughs) look at that.
>>This was to trim your grass, or you could also turn it sideways and use it as an edger along your walkway.
>>Nice, very nice.
>>Also maintain your hedges with the hedge clippers.
>>How heavy are these, though?
Eh, they're made of metal.
They're a decent weight, yes.
>>Right.
These days, cordless everything is kind of taking the place, but it's pretty much the same technology, but with a battery built in versus a giant battery.
>>Exactly.
I think that's just wonderful, and you don't even have to have the tractor run.
It's all- >>Right, it's all silent.
And it was a little less common, they also had an inverter, which you could connect to it, and that would give you 120-volt power if you wanted to plug in something that wasn't specially made.
>>Oh wow, they really did think of everything.
And I'm really impressed, and I still don't know why this didn't catch on, you know, 'cause what a package.
>>Right, it's just is one of those things with the timing.
The oil crisis wound down, and I think they just maybe tried to do too much all at once.
>>Yes.
Jim, I notice you drive an electric car and also that you have a lot of hobbies dealing with electricity, so tell us about that.
>>Well, in a way, like GE, I was a little bit ahead of the curve and started getting into electric cars, first, electric bicycles, then electric cars, before they were commercially available.
And there was a little bit of an underground group of people who would talk on the internet, and we would do our own conversions.
So I had a converted electric pickup truck was the first electric on-road vehicle I had.
And then the garden tractor was the first electric that way.
>>You've managed to take all of this old technology and put it into a store, The Electric Tractor Store.
>>Well, I guess I've always liked all things electric, and specific to these tractors is there are a bunch of them out there still and would like to see them in use and not get hauled off to the landfill or the scrap yard.
So I wanna make people aware that they can bring these back and also just generally educate people that this electric technology is applicable to yard care on up to farm-size care.
>>Yeah, that is so pertinent to this day where we're all trying to be sustainable.
We're all trying to recycle what has been used in the past and how we can move forward with it.
So you are spot-on, and I appreciate it.
Thank you.
>>Sure, you're welcome.
>>I had no idea that you were just such an electric guy.
(Peggy and Jim laugh) >>Reuse and recycle are key components of everyday living today, and to learn of an entire group of enthusiasts that have been doing just that in the landscape maintenance realm amazes me.
And now let's shift gears to another green technology that homeowners can take advantage of.
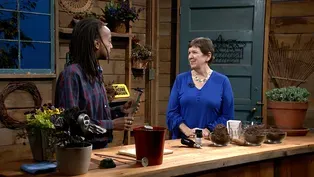
We're joined by Josh Dusci from Virginia State University to talk about hydroponic growing.
But before we get started, remember to send in your gardening questions on our website at vpm.org/vhg.
Welcome, Josh.
You know, I love a man who comes and brings his own salad.
(laughs) >>Oh yeah, we love salad around here for sure, Peggy.
>>We certainly do.
And what beautiful salad at that.
>>Yeah.
>>Yes.
>>But I love this system.
What are you doing here?
(laughs) >>So this is called a hydroponic system right here.
>>Uh-huh.
>>This is specifically a Kratky hydroponic system.
We've designed this DIY using materials that are readily available, and you can have this in home in a small greenhouse, in a garage.
>>Fantastic.
And I see all the components are very simple and available at most any store here in the United States practically.
>>Exactly, yeah.
>>Genius to whoever put this together.
>>Yeah.
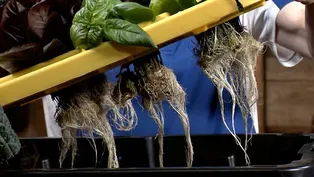
>>Well, tell me about it a little bit, 'cause we've got beautiful plants up top.
>>Sure.
Yeah, so we've got a variety of leafy greens here from lettuce, herbs, kale.
They're growing suspended.
>>Uh-huh.
>>So there's actually, there'd be water underneath these roots here.
So you can see beautiful roots.
>>Look at those roots.
>>Oh yeah.
>>I mean, that just tells you just how beautiful and lush and healthy those plants are, 'cause look at those roots.
>>Beautiful, for sure.
>>But if they have water in there, it doesn't today because of the weight issue.
>>That's right, yeah.
>>(laughs) Yeah.
>>But normally they'd have water and they'd be suspended in a nutrient solution where they're getting their nutrients to grow.
And as they're doing that, the water level in the system's actually dropping.
And so they're getting aeration and all the things that plants need to grow, so.
>>Right.
But you know, we, plants need, you know, air, they need, you know, fertilizer and such, but they also need light.
>>That's exactly right, yep.
So the DIY system would not be complete without our light rack here, which actually goes on.
This is all PVC here.
And so would go on just like that.
And your light would hang suspended from there.
And so we've got this LED light here.
>>Which is not light.
I have to tell everybody.
This is not a- >>So.
>>A lightweight thing, but it is light.
(laughs) >>Yeah, yeah, and that's why we've got the thicker PVC there.
So the light is a LED, it's adjustable, which in my opinion is the best thing that you can have.
Because you don't want to have to deal with a very tall light rack where you're having to lift the light up constantly.
So if you're able to adjust the light with the actual light itself, then- >>That's great.
>>Yeah.
Yeah, yeah.
>>Do you have a light monitor?
Something to be able to measure how bright that light is?
'Cause most systems, you're just a few inches off of the top of the plant.
>>Sure.
>>But with that, you're much higher.
So.
>>Yeah.
>>How can you monitor how bright to make your light for your plants to be so healthy?
>>So a good light that you're gonna buy is gonna be, they're gonna have a PAR map, which is essentially, it's already measured everything for you.
>>Okay.
>>So if you are looking at a light and it doesn't have that, I'd say maybe steer away from that, 'cause the actual monitoring is a little bit pricey for the good, you know, quality devices, so.
>>Right, right.
>>Yeah.
>>Well, let's talk about the plants.
>>Yeah, of course.
So primarily leafy greens are gonna be grown in this system.
You can do fruiting crops in hydroponics, but with this system here, we're looking at leafy greens, just because the basin is a little bit smaller.
And, you know, we're looking at a really passive system here.
And so a tomato or pepper, something like that, would require more of a, you know, complete system with pumps, and, you know, things of that nature.
And so.
>>But this is our DIY.
>>Exactly.
>>Well, let's look at these beautiful plants.
>>Yeah.
>>Can we put this one to the side and bring in the little guys?
>>Yeah, of course, yeah.
So- >>Here we go.
>>So this is just a demonstration of essentially what's going on in this system.
So as the plant is a little bit smaller, the roots are more or less fully submerged in the water.
>>Right.
>>But as it's uptaking its nutrients, which we have over here, which we'll talk about, and the water, it's actually leaving a pocket of air.
So the roots are able to breathe, but then the bottom of the roots are still able to uptake the water and the nutrients.
And so- >>Excellent.
So they still get the amount of moisture they need.
They still get the nutrients, but they also get the oxygen.
>>Exactly.
>>Many people don't realize how important that is for roots to have oxygen.
>>Yep.
>>And that's our soil as well as our water.
>>Yeah.
>>We need to accommodate for that.
>>Oh yeah.
An environment that doesn't have oxygen, you're looking at pathogens, you're looking at just plant issues.
They're not gonna be as efficient, so yeah.
>>Yes, yes.
>>Oxygen is life.
Water, nutrients.
>>It is.
>>Yeah.
>>Absolutely.
And the nutrients, you've got three different types here.
Can you explain them to me?
>>Yeah.
Yeah, of course.
So we've got the three part nutrient solution here.
And so typically whenever you're gonna find nutrients within hydroponics, it's either gonna be pre-mixed liquid, which is what you see here, or it's gonna be more of a granular kind of salt looking type nutrient.
And those, you have a little bit more complex nutrient recipe that you can build with those.
>>Right.
>>With these, these are already pre-mixed.
It's easy.
>>Love it.
>>Yeah.
>>Yeah.
Measure, dump and pour, huh?
>>Exactly.
Yeah.
Don't have to do much.
It's just that recipe's already made for you and you just kind of follow the instructions.
And so I think for this type of system, these pre-mixed nutrients are exactly what you're looking for.
>>And they've got nitrogen, phosphorous, potassium.
>>Yep, yep.
>>And then those are the macronutrients, but they also have the micronutrients in them.
>>Exactly.
>>People don't know that there's the Molybdenum and all those manganese and the M words that we need, so.
>>Yeah, there's 16 of 'em in total.
>>Yes.
>>Yeah.
There's also a couple on the spectrum too that they don't always talk about, but also still can be beneficial for plant growth.
>>Absolutely.
>>Silicon is one of 'em.
Yeah.
>>Real quick.
>>Yeah.
>>We talked about oxygen in the beginning when the water is high.
>>Yeah.
>>You've gotta have some way of introducing oxygen.
And we just have a few minutes, a little bit time left.
>>Yeah, so this is just a little aquarium pump here that we have.
We've got a check valve on it.
That prevents any water if your power were to go out or anything like that.
>>Oh, from siphoning back?
>>From siphoning, yeah.
'Cause you wanna keep that pump running, right?
>>Oh, yes.
>>So, and then we've got a small airstone on it too.
And so that's providing whenever the plant's real small, oxygen to the roots, so, yep.
>>Exactly.
And then super quick, the meters?
>>Yeah.
So these are just meters right here measuring EC, pH, essentially those are water quality parameters that plants, you know, are looking for and that you need to monitor as you're growing the plants.
But if you follow that pre-mixed nutrient solution, you should be pretty good to go.
So yeah.
>>Well, Josh, this is fascinating.
Such simple tools, such simple equipment, and having the right nutrient balances, people will be able to grow their own salad in their house, or even in schools.
>>That's what we hope for, Peggy, yeah.
>>Oh, it'd be kind of fun to get 'em in every classroom.
>>(laughs) That's right.
>>Well, thank you.
>>Of course.
>>Okay.
And now we're gonna get ready to answer your questions.
But first, Shana Williams has a tip to share for when you're growing in the ground.
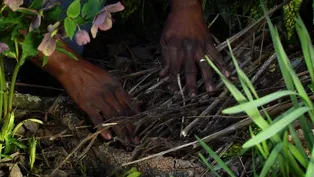
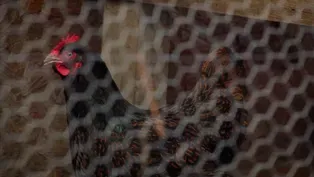
How to recycle chicken waste into a great additive for your soil.
(upbeat music) >>I have chickens and they produce two wonderful byproducts.
First of all, is their eggs, 'cause I enjoy eating eggs.
And their manure.
This manure is so rich, it adds so many great benefits back to the soil.
First of all, if you're working with manure, you wanna avoid E. coli, salmonella.
So use your gloves, make sure that you protect yourself from the raw manure if you're choosing to use it.
So I have three different stages of manure here.
This is my raw manure, which was just harvested.
You see the white in there?
That means that it has a high ammonia and urine content to it.
If I spread this around and I have plants here, it can burn my plants because it's high in ammonia, high in nitrogen.
The best thing to do is to compost it three months to a year.
It heats up to approximately 130 to 140 degrees for several days, and it'll kill the pathogens that's in your manure.
I have some manure here, also with some organic matter.
This is about three months old, I can mix this into my soil.
It is nice and tight, but one thing that I also wanna make sure that I do is water this in really good, because this has to break down.
I like to keep it in a separate black container, which has drainage holes, allow rainwater to wash away a lot of the ammonia that collects in here, and also the salt levels.
But I prefer to have more aged manure when I wanna put my veggies and plants in it.
I will take this manure, which is a over a year old, and it looks like mud, I will take this, mix it really well into my soil, and then once I do that, I'll take my planter containers and I'll fill it up with soil, and then I can plant directly into this container.
Now, when you're adding this manure to your soil, think about it, this is a recyclable, sustainable resource.
It builds your soil.
So if you know someone who has chickens, if you have chickens, add your chicken manure back into your soil.
Make sure that you compost it, give it that nice time that it needs, because all the other veggies and scraps that you're putting in your compost bin becomes that complete nutrient rich soil that your plants need to grow.
Try it, happy gardening.
(chicken clucking) >>Members of our team are on Facebook right now answering questions, so please connect with us there or visit our website, vpm.org/vhg to submit questions.
Today we have Randy Battle in the studio with us to help answer questions too.
Randy, I wanna say welcome.
We're excited to have you here on our first show of the season.
>>Thank you so much.
So glad to be here.
Always a good time when I come here.
Fourth season, so I'm glad about that.
And it's so good to see you.
>>Thank you, sir.
>>And your special guest, Josh.
>>Yes.
>>So I'm excited.
>>It is so exciting.
So what great questions do we have?
>>Okay, our first question is: "Does the water need to change in hydroponic kits?
And if so, how often?"
>>Sure.
So good question.
So if you have that EC meter, you can more or less keep that water going, as long as you're getting your EC up to the appropriate levels.
Now, after a while, you know, three or four, we'll say lettuce cycle, growth cycles, salt might start to build up in it.
And so at that point you may need to actually remove the water and kind of start fresh.
And then you just put that down the drain.
Or if you have house plants or, you know, put it outside in the garden or something like that.
You can absolutely do that.
>>And just for the people who may not have seen, what are the EC levels?
>>Yeah, so for leafy greens you're looking at, for a baby plant, seedling plant just kind of sprouted, you're looking at a lower, maybe 700.
And then as it grows, gets a little bit larger, for aggressive growth you're looking at 2,000, 2500.
>>Oh my.
>>Yeah.
>>Yeah.
>>Yeah.
>>I have a question.
For the water, is it a specific type of water, or do you, I mean, is it distilled water?
I have well water, so.
>>Yeah, well water, tap water works too.
You know, I definitely like to try and remove the chlorine or chloramine if you can in that water.
You can do that with some simple aquarium kind of fish.
They have this real nice chemical that you can add into it.
It's fish-safe, it's human-safe, it's safe for consumption and all that too.
And that just removes the chlorine.
But pretty much any water you can use.
Yeah.
>>Okay.
>>One thing too you would definitely want to be careful about is not adding the nutrient solution too quickly.
You know, really gradually increasing that.
'Cause then you could potentially burn the plant from too many nutrients.
>>Okay.
>>Yeah.
>>You know, that carries over into starting seeds indoors, when your first set of true leaves appear.
Not the coddle lead and the food leaves, but the first, you always put on a 50% solution of fertilizer.
Again, babying these plants up into it, not just hit them hard.
So it's the same thing for hydroponics.
Interesting.
Well, plants are plants, whether in water or soil.
>>That's right.
>>Yes.
>>And for a first time gardener, what's the budget?
A roundabout figure if they wanna start small, maybe in a kitchen, patio, porch, apartment.
>>So that DIY system that we just looked at, you're looking at, with the lights and everything, you know, 250 to $300 there.
Definitely depending on where you live too.
And then, you know, to keep that thing going with the nutrients, you're looking at, you know, maybe $20 a month or so.
>>Oh wow.
>>It's pretty inexpensive.
>>Yeah, and you can produce, you can continuously produce leafy greens throughout the year, right?
And so we have 15 holes on that plant or on that system.
And so, you know, you could look at a sequential where you're getting three lettuce plants every week, or you could do a big, you know, harvest.
If you got family coming, if there's a holiday, just get 15 heads off and do a big salad.
You know, anything like that.
>>Like with anything else, you'd wanna have a sterile container?
So if I had a container in my garage and I'd used it for other things, could I just sterilize it with a chlorine solution, you know, a bleach solution and then use it?
>>Yeah.
So you can definitely look at that.
You know, food-safe containers, I cannot stress it enough, right?
HDPE, plastic, if you're gonna use that, if you are using a container that, you know, you think has been used for something else prior, maybe stay away from that.
So you definitely need to be careful and do your research with food-grade plastic if that's what you're using.
>>Very good advice.
That's very important.
'Cause I'd grab something and sterilize it (laughs).
>>It's no good.
>>Not good.
>>You definitely wanna stay away.
>>Food-safe containers.
>>Yeah.
>>Yeah.
Took me a while to realize that that was going on.
You wanna take another question?
>>Sure, Let's go.
>>All right.
This is from Mary.
She wants to know, From Midlothian, new gardener here.
"I've heard growing tomatoes are hard because they have really long roots.
How do you know what size pot to plant tomatoes in for those long roots to grow?"
>>Oh, you can put 'em in just- >>So what do you guys think about this?
>>Well, I know, I have the container expert right here.
>>I grow 'em in five-gallon buckets.
I grow 'em in mop buckets.
I've even grown little cherry tomatoes in the windowsill.
It doesn't take a lot.
Even though they have a long root system, if you have enough soil and you get the container, it may be shorter but the roots can actually coil a little.
You don't want 'em to overcoil.
But you can get your some tomatoes in your home, in your windowsill.
>>Exactly.
And the thing with tomatoes too is planting them deep.
And the reason you plant them deep is because along that stem, additional roots come on out.
>>When you see those little fuzzies coming down that tomato plant, those are actually roots.
So yeah.
What do you think?
>>Yeah, I mean, so from a hydroponic perspective, five-gallon buckets work great too still, for a single plant of course, right?
If we were looking at that system again, you know, they have these containers in 27 gallon.
And so I'd look at something like that, maybe four to six holes on something like that.
>>Well, four to six plants.
>>Yeah, exactly.
Spread 'em out, you know, a decent amount.
You know, let 'em breathe a bit.
And the smaller the container though, you wanna be careful, 'cause then you're just gonna have to continuously be monitoring the water level and all of that.
'Cause that tomato, once it gets big, it's gonna really wick up some water.
And so you need to be careful with that.
>>Question.
I'm sorry.
>>And I was gonna say, that's where determinant tomatoes would be better.
There's determinant and indeterminate, where determinants are bred to grow, you know, flower, fruit, and that's it and stop; where indeterminate are vines, and they keep on growing.
>>Just keep going.
Yeah.
For our newbie gardener.
>>Yeah.
>>A quick question for you.
Are hydroponic plants able to be transported into a regular ground?
>>That's a great question.
In my experience, I found that it's a lot easier to move from soil to hydroponics than it is from hydroponics to soil.
It is still possible.
You just have to be, you know, thinking about the environment that they're coming from, right?
Very wet, saturated environment.
And then you move it to soil, that can dry out very quickly, right?
And so as long as you keep that soil very moist and, you know, slowly wean it off, then you can have a higher success rate.
I've had a lot of success actually propagating house plants, right, pothos or something like that, and moving them from a, you know, aquaponic or hydroponic environment to a soil environment.
But just always have to keep that soil very wet.
Or potentially using, you know, a different type of soil that, you know, has a little bit more perlite in it where it can stay wet a little bit.
>>Okay.
>>Yeah.
>>Well, gentlemen, that's all the time we have right now, but we look forward to answering more questions later on in the show.
So I encourage you to keep sending them in 'cause we love to answer your questions.
And Josh, I wanna thank you for sharing these tips on growing plants in a hydroponic system.
It's very enlightening.
>>Appreciate it.
Thank you.
And next, Dr. Robyn Puffenbarger visited Lesesne State Forest in Nelson County to see how the Department of Forestry is using drones to survey forest health and more.
So let's take a look.
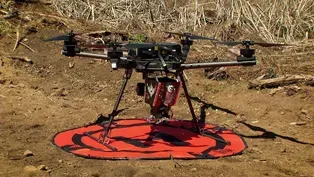
>>We have 36 drones in the Virginia Department of Forestry.
We have 21 pilots that are FAA 107 certified, and we use the drones for different projects.
They include fire management, forest management, forest health, conservation easements, and the water quality program.
This is our Alta X with the Ignis Drone Amplified platform.
Bill, take off.
(drone whirring) For our water quality management, we use them for our best management practices, so it saves our foresters and water quality engineers and technicians time and actually reduces the risk for them to be out on a 300-acre tract or so and allows them to monitor how well the logging operations are taking place.
For fires, Each of our drones have a thermal camera, and the thermal camera allows us to monitor any fire that escapes our fire control lines, or if we see the fire spreading in a certain direction based on the fire behavior and the terrain.
That reduces exposure and mitigates firefighters going in areas which are unsafe.
>>For prescribed fire, we use it mainly to get the interior of a tract.
We'll have our certified prescribed burn managers using drip torches to burn on the sides along a firebreak, and then we'll use the drone to get the interior of a tract.
We're able to use these Dragon Eggs.
When it's injected with antifreeze, it forms a combustion when that ball hits the ground.
>>So the Forest Health program at the Virginia Department of Forestry monitors the state of Virginia for forest health disturbances.
Those disturbances can be invasive insects, they can be tree diseases, non-native invasive plants, even abiotic disturbances, things like big storms that come through and take out a lot of our trees.
Those are all things that cause damage to our forests, and so it's our job to try to monitor the state for them.
>>So how would you actually find that kind of damage?
Are people just, you know, hiking and looking up like I would be and saying, "Oh wow, that looks odd, that tree, that oak tree should have leaves now and it doesn't"?
>>Yeah.
A lot of our data does just come from reports from landowners, like you said, just out hiking around and noticing these things.
Also our foresters.
We have foresters in every part of Virginia, and so they let us know what they're seeing out in the field.
And when we hear about damage, then we'll go out and we'll try to do a more comprehensive survey to really map out the extent of the damage.
And so that's something that we've actually used planes for in the past.
Our staff will go up in a small aircraft with a tablet and some special mapping software and actually try to map out the damage that they're seeing in the canopy of the forest.
>>Wow.
So other than the planes, is there some other technology y'all are beginning to use to monitor forest health?
>>Yes, we're very excited that we are starting to incorporate drones into our forest health monitoring work.
We're kind of just scratching the surface on what we could use drones for.
There's so much technology that we hope to incorporate into our program in the future.
But right now, even something as simple as sending the drone up into the sky to take a picture of the canopy, that can really help us better understand the damage that's happening to our trees and potentially what could be causing that damage.
>>Wow, and so do you just work in the state forests?
I only know of one in my local area.
Are there many more across the state?
>>Yeah, we have 26 state forests in Virginia and we certainly monitor our state forests, but really all parts of Virginia that have forest land.
We're interested in any big forest health disturbances that may cause significant damage.
>>Then you work with private landowners as well?
>>We do.
We work a lot with private landowners.
All the information that we collect, all the data that we collect, we try to make that available to private landowners so they know where these disturbance agents are, where damage is in Virginia, and how they can better manage their own land.
>>Are you still looking for hemlock woolly adelgid, or has that pest basically left the state?
Because that was many years ago when I was seeing the hemlocks dying in our forests.
>>There's a long list, unfortunately, of insects and diseases and invasive plants.
The hemlock woolly adelgid is still an issue that's threatening our hemlock trees.
That's a tiny little insect that causes hemlock trees to lose needles, branch dieback, and then eventually tree death.
There's also the emerald ash borer, and that's another beetle, an invasive insect that's attacking our ash trees.
>>And then spongy moth.
Are we still worried about that?
I thought that had kind of died out maybe 20 years ago, but maybe not.
>>No, we still have spongy moth.
It's kind of one of our oldest invasive insects.
It's been established in Virginia for quite a while, since I think we first started to see spongy moth damage in the 1980s.
And so we'll have periods of time where we hardly see any spongy moth activity, and then we'll have years where the population will increase and we'll actually have outbreaks of spongy moth and we'll have significant damage.
And spongy moth is a caterpillar, so it actually eats the leaves of trees.
And when that happens during outbreak years, we'll see hundreds of thousands of acres of damage due to the spongy moth.
And then a lot of people are familiar with the spotted lanternfly.
That's one of our newest invasive insects that's also threatening multiple plants in Virginia.
>>Wow.
I had no idea that spotted lanternfly would be after our forests.
We're hearing a lot about it in our gardens and the havoc it could potentially wreak on our viticulture.
What would it be doing in the forests?
>>Well, we're not quite sure if it's a true forest invader yet.
There's still a lot of research going on about that, and since it's a new invasive, we don't fully know if it will invade our forests.
But we do know that it prefers tree of heaven, which is an invasive plant.
And so as part of our treatment program, we're trying to identify and remove tree of heaven to prevent the spotted lanternfly from spreading.
>>So Lori, how would you look for something like tree of heaven in the forest?
Even from the air, it seems like you'd be looking for a needle in a haystack.
>>Yeah, so in the past we've actually gone up in a helicopter to look for and identify pockets of tree of heaven.
And we're able to do this in the winter when the female trees retain their seed pods, so we're able to clearly see individual tree of heavens as we're flying over them.
But we are excited to start using drones for survey work like this in the future.
>>Wow, that's just incredible.
I just am blown away by how much you can do.
Thank you so much for all this information.
I've learned so much about how technology impacts and helps monitor forest health in the state of Virginia.
>>My pleasure, thank you.
>>Virginia's healthy and productive forests are the result of the innovations of the Department of Forestry.
Their staff is wonderful, and their willingness to embrace new technology to monitor and manage our state forests is exemplary.
Jason Braunstein was planning to be with us today to talk more about drones and their uses in controlled burns and firefighting, but as you've probably heard, there are several wildfires currently burning in the western part of the state.
And understandably, the Virginia Department of Forestry is very busy.
We wish everyone in the Department of Forestry the best.
And thank you for your hard work.
Hopefully the drones are helping you out.
So instead, Randy and I have another bit of gardening tech that we're gonna talk about.
>>Absolutely.
>>But before we begin, remember to send in your gardening questions through our website, vpm.org/vhg, or through our Facebook page.
Well, Randy, we're gonna have fun talking about soil, and we're gonna talk about tools for measuring moisture, as well as soil temperature, as well as pH.
>>Yes.
>>These are things that people sometimes get caught up on, you know?
>>Absolutely.
>>You know, we say the finger tests and some people don't get it, so.
>>Right.
>>There's simple tools.
>>Yeah.
We've all started somewhere.
>>Yes.
>>When you start your garden, you have to start somewhere.
>>Absolutely.
>>And you don't know everything when you're first starting out.
And there are some key things that we have to focus on if we want a healthy garden.
>>Absolutely.
Be it flower, vegetable- >>Flower, vegetable- >>Inside or out.
>>Inside or out.
>>Right.
>>House, deck, patio, or apartment.
>>Yes.
>>We can grow whatever we want.
We just have to make sure the conditions are well for what we're trying to grow.
>>Absolutely.
Absolutely.
>>Yeah.
So with your help, I would like to show some things that will improve your gardening conditions.
>>Let's get going.
>>So let's start off with moisture.
>>Yes, the most important, 'cause if you don't have moisture, you don't have a plant.
>>And if you have too much moisture, you don't have a plant.
>>Correct.
>>We wanna kinda balance that out.
And over here I have some tools.
This is basically a rain gauge that you would sit out in your yard and you can monitor the moisture.
>>Yes.
>>From the rain that comes in from Mother Nature.
You know, Mother Nature does how she wants to do when she wants to do it.
>>Exactly.
>>So this is a good way of monitoring how much you get, because some areas have more rainy seasons than others.
>>Correct.
>>Do you use anything like this?
>>I do.
And you know what else I do?
I write in on my calendar on my phone how much rain fell that day.
>>There you go.
>>And I put "Rain" so that I can just hit search and it pops all the rain that has fallen.
>>Yes.
And that's a good point.
Always keep a log of what you're growing.
>>Absolutely.
>>I can't stress that enough for new gardeners.
Just get you a little notebook and just write down certain things, because it'll come back next year and you'll be like, "I remember what happened with that."
>>Yeah.
Well, let's move along, my friend.
>>Yes.
Also, you have moisture gauges.
>>Yes, these little meters, you know, I didn't put a lot of credibility in these in the beginning, but I understand their value now.
>>Yeah.
There are different types, different varieties.
Some read better than others.
>>Yeah.
>>But it's just depending on, you know, what you can afford and- >>What you can use 'em for.
>>What you can use 'em for.
So we like to take these and put 'em down in our house plants.
>>And in our potted outside plants too.
>>Yeah.
And this is an outside plant, I'm sorry.
This is an outside plant.
These are some pansies.
And you would just press it down in there and the gauge would read the moisture for you.
>>Right, well, we've got some other gauges too to read other things.
>>Yeah.
Absolutely.
>>So let's move on.
>>Now we want to talk about temperature.
>>Yes.
>>Temperature with your soil, is very important.
>>Absolutely.
>>You don't want it too hot.
You don't want it too cold.
You have to look out for your frost date.
I tell people, "Always look online and find out your frost dates."
>>Right.
But also, I tell people, "Check your soil temperature."
>>That's right.
>>Yeah.
>>And as you can see- >>We've got a nice- >>They come in all different sizes, shapes.
This is a basic, almost looks like a turkey thermometer.
>>It does.
It does.
>>But it gauges the moisture, I mean the temperature of your soil.
And it's always good to have.
Also, if you have a compost bin, you want that temperature to get about at least 150.
>>At the very most.
>>At the very most.
>>130 to 150.
>>Now, this is a long gauge- >>Perfect for compost.
>>Yes.
>>Too long for soil.
>>Right, because your compost pile is normally gonna be a big pile.
>>Yeah.
>>So this is good for that.
>>And then another wonderful gauge we have is our fertilize, I mean, sorry, is our pH.
>>Yes.
>>And I'm gonna show you three different types.
There's clay soil.
>>Thank you.
>>Here's garden soil and here's potting soil.
>>All right.
>>Okay.
And we've got different pH monitors, correct?
>>Absolutely.
>>So we have, you wanna go- >>Tell us about this one.
>>Well, this is a pretty high-tech one.
It's one that professionals use, and it's got these plates right here that you put all the way into your soil, and you let it sit there for a few minutes and it will tell you the pH of your soil.
And it's very precise.
>>Amazing.
>>It's a wonderful gizmo.
>>Amazing.
>>Yes, you just press the button, which is right here, and then give it a few minutes.
So there's that one.
>>Okay.
It's readin'.
And for those of you who don't know what pH is, it's monitoring the acidity and the alkalinity of your soil.
>>Correct.
>>A lot of plants, like your peppers and your tomatoes, all those things, they're more toward the acid.
>>Mm-hmm, slightly, ever so slightly, with middle being seven.
>>Yes, so most people gauge from zero to 14 with seven being in the middle, okay?
So you wanna keep that in mind when gauging your pH.
Now, another way- >>We have one minute left, my friend, so we've gotta speed racer this.
>>We use these test strips as you can see.
Now we've already tested these >>And we found out that?
>>And they come with a monitor, just like so, you wanna put it up against there like that.
Well, turn it the right way.
>>Yeah.
>>And you can gauge your pH, you guys.
As you can see, this is about a 4.5.
>>Yeah.
>>So we're gonna move on.
>>For those who don't feel comfortable with any of this, Virginia Tech, as well as local labs will test your soil for you.
And the best way to do it is to take different samples from your garden, mix it together, and then put that into the kit.
You can get these kits at your local library.
It's through our Virginia Cooperative Extension Agency.
>>Awesome.
>>Yes.
>>Awesome agency.
>>Yay Virginia Tech and Virginia Cooperative Extension, and Virginia State University too.
>>Yes, hopefully that helps you guys out when getting your garden started.
>>Yes.
>>Whether you're new, beginner, or an expert.
>>They're low-tech things, but they sure help us all.
>>Absolutely.
>>Thanks, Randy.
>>Thank you so much for having me.
>>You're welcome.
Next, we're going to answer more of your questions, but first, Serome Hamlin has a tip for ways that you can easily add habitat for your insects in your yard or garden.
(upbeat rhythmic music) >>As I enjoy this beautiful day in the garden, I can't help but think about our native bees and insects.
The insect population is on the decline, and we all know that they play an important role in our ecosystem; that includes our gardens.
Yes, our gardens are manmade ecosystems and it's up to us to help.
So, the first thing I want to do on my list is to put up a mason bee habitat.
This is a purchased habitat for mason bees who like to find tubular structures to lay their eggs.
So I've chosen a spot where I can hang this.
You gotta think either south or east-facing.
So I'm choosing an east-facing direction.
I've already pre-drilled the holes, so this will make this easy and you don't need a lot of tools to do this.
Anybody can do this.
Our mason bees are actually very good pollinators.
In fact, they are more efficient pollinators than the European honeybee.
Now I've got a spot for when the mason bees are looking to lay their eggs.
Hopefully, somebody will find it and I will have a new crop of bees next season.
Now that I have this up, I'm gonna move on to another project.
And this project should not cost you anything.
Most gardeners have all the materials on hand.
In this section of the garden, I do not frequent very often.
So it would be a great area to put in a insect habitat.
Just walk around and you can gather branches.
And we're gonna just start laying them in, creating little pockets for different insects to maneuver around.
And you can also use leaves, stems from your cut perennials in your garden beds.
And we can just break this down and just stack this in.
Now, doing this, this will give not only shelter, but it also will provide food and places for these insects to lay their eggs to carry on their life cycles.
And with it being in a section of the garden that I don't do a lot of work in, it is great that these insects will have a spot that they're not disturbed.
So, simply just stack these areas.
(branches rustling) (birds chirping) And it's simple enough.
And I hope everyone will take advantage of a small area in their garden to provide a habitat for insects.
It doesn't have to take a lot of space, and you more than likely have the materials on hand.
So we can all do our part to help the insect population and just take up a little space in our garden and provide a habitat for them.
>>It's important to support our beneficial insects all through the year, especially our native pollinators.
We've seen many great sustainable practices today from green technology to simple tools, still the principles remain the same as we strive to adjust our ways to dive deeper into understanding how best to care for our environment.
And now let's get to more of those questions that you've been sending in and Josh has kindly agreed to fill in for the second half.
Thank you, thank you so much.
>>Thank you.
>>We've got some good questions here.
And first one is, "What is the best time of day to take soil temperature readings and to know the right time to plant vegetables?
And how many days does a temperature have to remain steady to begin direct sowing?"
>>That's a triple question, right?
>>It is a triple question, so I've got the answer.
(Peggy laughing) >>I say measure all day.
Take 24 hours, watch your sunlight.
Engage what's happening in your space from sunrise to sunset, how many hours you have in a day where your sun's moving in your yard and go from there.
You have to put a little time in.
>>I actually take the soil thermometer, I put it in my ground in the beginning of March, actually middle of of February, and I just leave it there and I push it all the way down into my soil because it's soil temperature, not air temperature.
And then I can just go out there and monitor and look at it and I know by the different temperatures when to do things.
And we are gonna actually put on our website a chart that will tell you tomatoes like it at 65 degrees soil temperature, where you can plant potatoes at 50 degrees soil temperature, but you can put your peas in in the 40s when the soil temperature is in the 40s.
So if you put the thermometer in and just leave it there and just watch it, you can start to see it rise and it will tell you when you can plant things, not the calendar, so you'll be able- >>That's a good thing to have.
>>Have the best crops.
>>It's a great investment.
>>It's a small investment and it's sure worth a lot, so I, yeah, so I'm gonna jump onto the next one 'cause we have a lot of questions and I wanna try to hit as many as we can.
So the question from Denise from Midlothian asks, "How do you start the plants or seeds in the hydroponic system?
Do you start them in the big system or in little containers first and then transplant them to the big system?"
Help us out here.
>>It's a great question.
You can actually start 'em in soil and then transplant 'em, but you're definitely not gonna start 'em in the big system first.
You're gonna start 'em in a smaller system, a germination system, maybe a tray.
They have the 10 by 20 flats.
There's stuff called rock wool.
You could use a different type of media too.
So definitely out of the system to answer that question, but then how you do it, there's a possibility of answers to that.
How do you all start your seed?
>>Yeah, exactly, I start mine in my little trays.
>>I'll take what I have and make it work.
>>Yeah, exactly.
>>Whether it's styrofoam cups, red cups, whatever I have, I'll take it and make it work as long as the soil is in a good condition because most seeds have their own nutrients when they first start.
>>Yes, they do, they do.
>>You don't really need a whole lot of fertilizer.
>>A friend of mine uses paper product rolls.
>>Oh wow.
>>Absolutely.
>>And then she can move them right out into the garden.
>>First time I ever germinated seed, it was just a wet paper towel and that was it and then move it in, so yeah.
>>And that's a quick, easy way to germinate seeds and you know which seeds are viable.
>>Yes, absolutely.
>>I love that method.
>>Well, we have another question from Zachary in Richmond and he lives, or she lives on a first-floor apartment with a small back porch.
"Do you have any tips for bucket growing a small herb and vegetable garden?"
>>I would start my herbs in a smaller container.
I mean, you can use a larger container if you like herbs or you have space to harvest them and store them, but I like the more smaller, maybe 2 1/2 gallon my kitchen window.
>>Yeah.
>>Yeah.
>>You can't get it this big or you have to water 'em every few hours.
>>Right.
>>But you can get above size so that it holds the roots as well as does not need to be watered every day.
>>As much, yeah.
>>Until we get to July and August, so.
>>I've even gone to the grocery store, get those herbs that they sell that are already kind of growing in pots and all that, take what I need and then try and save 'em, same with the green onions and all that too.
>>Absolutely.
>>I love trying to do that.
>>Well, I'll be honest, I have one of those on my window sill that I bought last year.
It's going in the garden in a few weeks.
>>Exactly.
>>But yes, you can do it in small containers, but not tiny containers.
We're saying put 'em into smaller containers and then when they get really large, move 'em to bigger containers.
So, all righty, we have another one.
We have, "I only have two inches of topsoil before hitting red clay.
How much top soil should I have for a vegetable garden?"
>>I would go a little bit more than 2" >>Definitely.
>>Yes, especially with clay soil.
You wanna break that soil up.
>>Got to.
>>You mentioned Perlite and vermiculite and different things.
>>Compost.
>>Compost, amend it, amend it, amend it, yeah.
My first property I had was total clay and I just had to work it to get it to where I have it today.
>>Because there's actually a transition zone between one type of soil and another, so you have to scratch a little and actually kind of put a blend in there so that the roots can go and adjust and go down 'cause they're gonna hit that clay and they're gonna stop, so you've got to get about 6", 8" of soil, and you can, again, we are encouraging you to put in compost and to really, you know, add yourself and incorporate it.
>>You have to explore it a little bit because you can see that first couple of inches and think, "Oh, I have perfect soil."
If you go a little bit deeper, you may have that clay.
>>Yes, all right, we just have one minute left, so where can a hydroponic kit be purchased in Richmond?
Where can they get the instructions?
>>Whew, we will be releasing a fact sheet, actually, a how-to guide for that DIY system, so once that's out, you can follow that.
There'll be a video accompanying that too.
There's always, you can find stuff online.
I think those are really easy to get your feet wet with, but then, you know, you can evolve out of that.
But it's difficult to find something that's pre-made that's cheap and still works good, you know?
So that's why I think DIY is a solution to a lot of that.
>>Should they contact Virginia State University or should they contact just the Cooperative Extension Office in their county?
What would you suggest?
>>Yeah, I mean, being in Richmond, contact VSU.
We can certainly help out, or the Extension agent, one of the two will, someone will help, for sure.
>>Well, thank you.
We are out of time and, gosh, this evening has flown by, so Josh, I just, I wanna thank you for being with us and being a team player tonight.
>>Thanks, Peggy.
>>And we appreciate it.
And we thank Jim Coate.
He did great too with showing us that some equipment that we never knew about.
And a big thanks to everyone at the Virginia Department of Forestry for working to get these fires under control.
Please, stay safe.
Randy, we appreciate you being here.
It's always a pleasure having you and it's just so much fun.
But more than anything else, we thank you for watching.
Now, there are several ways for you to stay connected with us until we're back again, and if you're not on our Facebook page already, head over now for Randy's latest edition of "Take What You Have and Make It Work," so Randy, what topic is it this time?
>>This time we are, what did we do this time?
>>You're growing potatoes in a bucket.
>>Potatoes!
>>Yes.
In addition to that, you can sign up for our monthly newsletter at VPM.org/VHG for gardening information from me and the team.
I look forward to being with you again soon.
Until then, remember, gardening is for everyone and we are all growing and learning together.
Happy Gardening.
>>Production funding for "Virginia Home Grown" is made possible by the Mary Roper Davis and Robert Poore Roper Memorial Fund.
And by... (birds chirping) (upbeat acoustic guitar music) (upbeat acoustic guitar music continues) (dramatic music)
Video has Closed Captions
Clip: S24 Ep1 | 26m 46s | Explore green technology for forests and home gardens! (26m 46s)
Video has Closed Captions
Clip: S24 Ep1 | 7m 34s | Learn how the Virginia Department of Forestry is taking forest management to new heights (7m 34s)
Video has Closed Captions
Clip: S24 Ep1 | 8m 59s | Discover a line of electric lawn care equipment from the 1970s (8m 59s)
Video has Closed Captions
Clip: S24 Ep1 | 3m 10s | Add space in your landscape for native pollinators (3m 10s)
Video has Closed Captions
Clip: S24 Ep1 | 2m 42s | Composting chicken manure creates a rich additive for garden soil (2m 42s)
Video has Closed Captions
Clip: S24 Ep1 | 6m 33s | Create a hydroponic system for growing leafy greens indoors (6m 33s)
Video has Closed Captions
Clip: S24 Ep1 | 5m 52s | Simple tools to improve your garden soil (5m 52s)
Providing Support for PBS.org
Learn Moreabout PBS online sponsorship


Support for PBS provided by:
Virginia Home Grown is a local public television program presented by VPM