Virginia Home Grown
Regenerative Growing
Season 24 Episode 6 | 56m 46sVideo has Closed Captions
Caring for garden soil creates healthy plants.
Visit Mountain Run Permaculture in Sedalia to learn how permanent beds reduce soil compaction. Then explore Real Roots Food Systems in Mechanicsville and discover the benefits of vermicompost. In the studio learn how to make soil inputs rich in microbial life. Engage with us or watch full episodes atFacebook.com/VirginiaHomeGrown and vpm.org/vhg. VHG 2406 August 2024.
Virginia Home Grown is a local public television program presented by VPM
Virginia Home Grown
Regenerative Growing
Season 24 Episode 6 | 56m 46sVideo has Closed Captions
Visit Mountain Run Permaculture in Sedalia to learn how permanent beds reduce soil compaction. Then explore Real Roots Food Systems in Mechanicsville and discover the benefits of vermicompost. In the studio learn how to make soil inputs rich in microbial life. Engage with us or watch full episodes atFacebook.com/VirginiaHomeGrown and vpm.org/vhg. VHG 2406 August 2024.
How to Watch Virginia Home Grown
Virginia Home Grown is available to stream on pbs.org and the free PBS App, available on iPhone, Apple TV, Android TV, Android smartphones, Amazon Fire TV, Amazon Fire Tablet, Roku, Samsung Smart TV, and Vizio.
Providing Support for PBS.org
Learn Moreabout PBS online sponsorship(light music) >>You want to have living roots in the soil as long as you can throughout the season, ideally all year if you can.
And here in Virginia, it's actually quite easy to do.
So living plants are feeding nutrients into the soil and they're giving the microbes basically a food source to live on and to create a larger population.
>>Pests aren't really there to destroy your farm.
They're not thinking about like, "Oh, I'm going to take this farmer down."
You know what I mean?
"I'm going to wipe his profits."
They're trying to help identify the weaker plants that should be worked out of the system.
>>Production funding for Virginia Home Grown is made possible by the Mary Roper Davis and Robert Poore Roper Memorial Fund.
And by.
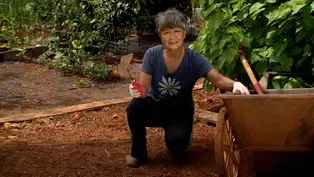
(birds chirping) (lively music) (lively music) (lively music) >>Welcome to Virginia Home Grown.
I want to celebrate because we made it through the summer heat and the garden is rebounding with the cooler temperatures.
Today we're exploring regenerative growing practices, and we will meet farmers to discuss the methods they use to feed and improve the soil.
Before we get started, I want to remind you to send in your questions for our guests or about other gardening issues you are having on our website, vpm.org/vhg.
We'll be answering those a little later.
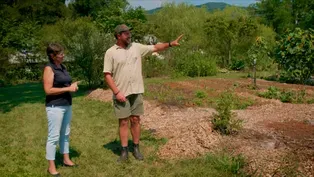
In the second half of our show, we will visit Real Roots Organic Systems in Mechanicsville and talk with Mark Davis about how he maintains healthy soil for commercial tomato productions.
But first, I visited Mountain Run Permaculture in Sedalia to meet Mark Angelini and learn why avoiding soil compaction is important in the vegetable garden.
Let's get going.
>>We use a lot of what we call regenerative growing practices.
And that's a fancy way of basically saying we mimic the processes we see in nature to help renew the soil and renew diversity in the ecosystem.
So we practice things like minimizing soil disturbance, so we don't really till or turn the soil if we can help.
>>Okay.
>>We incorporate perennials.
So we have this perennial backbone with things like blueberry bushes, pollinator strip with echinacea, some asparagus.
Then we incorporate a large diversity of different plants, and we also use a lot of cover cropping to help feed the soil, build carbon, and stimulate a lot of biological activity.
>>So you're really focusing on the soil, you're focusing on pollinators and you're focusing on basically diversity within the garden.
>>Yeah.
Yeah, it's, it's really looking at the garden as an ecosystem.
So we have all the different elements.
We have the pollinators and the insects.
>>Right.
>>We've got the microbes in the soil.
And then just trying to do as much as we can when it comes to the work we do in the garden that will help to foster and feed all of those different elements.
>>That's amazing.
What are some of the simple steps that people could take?
Just maybe two or three, just to make some baby step changes?
>>Yeah, the first thing is to minimize disturbance.
So if you're tilling constantly, minimize your tillage to, you know, maybe once a season.
And then really the biggest impact you're gonna have is by incorporating really good biological inputs.
I like to recommend people use vermicompost 'cause that tends to be very safe and high quality input.
I mean, if you start doing that, getting good irrigation's also very important.
>>Very important.
>>A lot of people don't irrigate enough.
>>Yeah.
>>And so without enough water, you can't really stimulate the biology and get those plants to root as deep as you need them to to get the nutrients and minerals that they need to be healthy.
So between those three very simple things, almost anybody can improve their gardening experience.
>>That's fantastic.
Now, you told me earlier that this garden here is one of your newer gardens.
>>Yes.
>>And that you've been struggling with this soil >>A little bit, yep.
>>Yes, but you've got a more mature garden, we'll call it.
>>Yeah.
>>In the back.
>>Yeah.
>>So I'd love to go take a look at that.
>>All right, great.
>>All right.
>>All right, let's be careful to step over the beds.
>>Okey dokey.
>>So we don't compact the soil.
>>No, we wanna protect that soil for sure.
So, golly, you've got beds, definitely walkways.
You know, what do you have going on here?
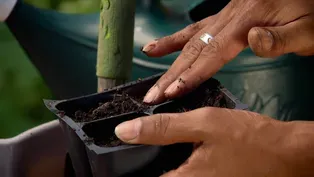
>>Yeah, so we, in all of our gardens, we use a permanent bed system.
>>Okay.
>>Which I highly recommend for almost any use case of a garden.
And so we have a 30 inch wide bed, about an 18 inch wide path.
And so we keep all of our walking and traffic on that path.
And the bed itself is allowed to stay nice and porous and aerated without being trampled on or using too much equipment on it and so on.
So that's a really key differentiation of the way that we grow, is we, we wanna minimize all of the potential for compacting that soil back down as we've done so much work to build it up.
>>So, Mark, so many homeowners, they don't even know where to begin.
You know, they've got this lawn out there and they're wondering how do they start a garden in that.
So if you just have lawn, you know, where do you begin?
>>Well, there's a whole range of different techniques.
The easiest one that I like to recommend to most people is using a tarp to kill off the existing vegetation.
It's called occultation, or sometimes called solarization.
And once you've killed everything off, you're basically rotting all that organic matter back in.
So you're kind of feeding it.
And then my approach is to test the soil, amend the existing soil based on that soil test.
Bring in your good compost, your vermicompost or your compost extracts to bring in the biology and some organic matter.
>>Right.
>>And then establish where the beds will be, and then put your path down, which I prefer wood chips, they're a nice material.
They break down.
You can eventually put them onto the soil surface to build that organic matter.
>>Exactly.
>>And then refresh them every several seasons.
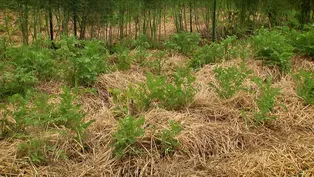
For this season, we grew a cover crop through the winter.
I cut that down.
I use some of that as mulch on the edges, and then I plant out whatever I'm gonna have in here.
And then I bring in some local straw.
>>Right.
>>And that acts as a really fantastic mulch to keep the soil cool, covered and moist.
>>Absolutely.
Abso, moisture is a key to this.
>>It is key, yes.
>>Yes.
>>It's often an overlooked aspect of gardens that I find is people think, you know, rainfall is enough or a little bit of sprinkler here and there.
But oftentimes irrigation can be one of the limiting factors for success in a garden is not getting enough water.
And sometimes too much depending on your soils.
>>Yeah.
>>But oftentimes, it's usually too, too little water I've seen.
>>Yeah, and you want that water to go deep.
>>Yes.
>>Not just a little bit.
>>Yeah, so that all plays into building the soil up, not compacting.
That allows for the water to infiltrate, allows for good gas exchange with oxygen and carbon dioxide.
And it creates a nice home for all those microbes to live and thrive.
And they're gonna do a ton of the work for us.
They're basically our underground livestock.
>>Excellent.
That's a good way to look at it.
>>Yeah.
>>But how do you deal with, deal with weeds?
You hardly have any weeds here.
>>So we do have some weeds, depending on what, you know, action we might take in here.
So after cutting a cover crop, there might be some stuff that germinates.
So we will use like a wheel hoe.
>>Right.
>>But then we'll knock those down and start mulching.
But there's certain plants in here like this Holy Basil here, or Tulsi.
>>You're right.
>>Which is a naturalized garden plant that has become a weed for us, so to speak.
So I have a, all throughout my garden, there's different plants like that.
We have a amaranth over in the other part of the garden that is another plant that just comes up and I leave it.
It has different benefits to it.
You can eat it.
So that's a really cool aspect of kind of letting your garden be a little bit more wild.
Some people don't like that, but there's a lot of benefits.
This is bringing in pollinators.
We can harvest it for tea.
It's just beautiful and smells amazing.
When you rub up against it, it gives you this nice perfume in your garden.
So a lot of benefits to having kind of naturalized plants that you like that come up as weeds.
And they're not so much a nuisance as much as a benefit.
>>Exactly, you don't have to be such a purist.
>>Yes.
So I'm not, I'm, I like order, but I also like the wildness because of all the benefits that come with that.
It's just controlled wildness basically.
>>Yeah.
So back to the soil.
How do the weeds affect the soil?
>>There's a few ways to look at weeds.
One, they're an indicator of what's happening in your soil.
They're telling a story of what's happened, and they ultimately show up because of whatever's happening in that soil.
And there's different weeds have different callings, we'll say.
There might be a mineral, there might be a microbe that's telling that seed to wake up, it's time to get to work.
And so they have a different root system, or they'll bring up different minerals.
So they're there to really repair the soil and to get it back into balance 'cause generally everything we do in a garden, when we're not thinking more of big picture, can be leading away from the health and vitality of the soil.
So the weeds usually show up and say, hold on a second, you've done too much tillage.
So we need to bring in these plants that grow really fast and build up carbon.
Or maybe that's gotten too fungal.
So there'll be some woodier plants like blackberries, things like that.
>>That will pop on in.
That's interesting.
The soil now that you've been working with here has been eight years.
>>Yes.
>>But where we started.
>>It's about four years old.
>>Can you show us the difference?
>>Yeah.
Got a nice little example here.
So this is a good representation of the just basic soil here without any real attention.
So you can see kind of typical red Virginia Clay.
>>Correct.
>>Has very poor soil structure.
>>Yes.
>>It's got very little pore space, little bit of organic matter.
>>Tiny bit of organic matter.
>>And here is a sample from this garden where we're standing.
You could see organic matter-- >>Gorgeous.
>>Through this whole sample depth.
>>Yes.
>>We've got really good aggregation, nice and crumbly.
That's telling us we have lots of biology working, especially good fungal activity.
There's lots of moisture.
We keep this nice and irrigated.
A lot more vitality, a lot more rooting depth available for the plants to take advantage of.
>>So you can see right here, proof is in the pudding.
>>It works.
>>It does.
>>Yes, it does work.
It does take a little bit of thinking and planning, but simple, small steps every season will lead you towards this.
And you know, this isn't the end.
We're still working on these soils, so we'll just keep working as long as we keep gardening here.
>>Well, Mark, I wanna thank you for sharing your experience and your expertise in regenerative gardening and being able to grow such beautiful plants.
>>Thank you, thank you.
>>And do it in such lovely soil.
I commend you.
>>I realize the concept of focusing on the soil is new to many gardeners, but once embraced doing so will slowly ease the time spent maintaining a garden while increasing the health of the plants.
And now I'm joined by Marco Thomas from Marco's Microbes to talk more about the life in our soil.
But before we get started, remember to send in your gardening questions on our website at vpm.org/vhg or through Facebook.
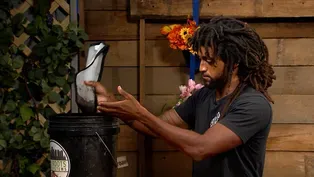
Well, Marco, it looks like you almost have a chemistry set here.
(both laugh) >>Yes, I do.
>>But it's with tools from the kitchen.
Tell us about this.
What are we doing here?
>>Yeah, so today we're gonna make a natural farming input called lactic acid bacteria.
In short, natural farming is, it's taking your mind back to a time before chemicals, before manmade fertilizers, using principles like everything you need is around you.
And so what we're gonna do today is culture some indigenous microorganisms called lactic acid bacteria >>Cool.
>>from simple ingredients that we have in our kitchen.
>>So what do you have right here?
>>This bottle is gray water.
It's just simply when you rinse your rice, if you're gonna cook rice, or if you boil pasta, that water that's left behind is gray.
It's full of starches and micronized.
And it's good to culture microbes.
So that's what this is here.
>>Sounds great.
And how do you start culturing those microbes?
>>All right, the process is pretty easy.
You wanna get a vessel, any vessel.
I like to go at least half a gallon.
And you wanna take that vessel and break it up into eight different parts.
>>Okay.
>>I wanna put 1/8 of this gray water into my vessel.
And that's it, that starts the process.
Now we have our gray water in here, we wanna take a breathable cloth and put it over the top.
And I want microbes to be able to grow in here, which is why I want the breathable aspect of it.
>>Okay.
>>We like a wide mouth as well because we wanna get that air flow in there.
And I'll set this near a compost, even in my compost, make sure it doesn't get rained on.
>>Yeah, yes.
>>And in about 36 to 48 hours, you'll notice a distinct smell to this water.
Right now it doesn't smell like anything, but you'll get like a sweet smell.
It'll get a little cloudier.
And that'll tell you the microbes have colonized that water.
>>Excellent.
>>And then we're ready to take it to the next step, which is the culture of the microbes.
>>And how do we culture the microbes?
>>All right, so let's just use our imagination.
One of the principles I use is have an open mind when it's natural farming.
So having an open mind, we'll pretend this is set out for four days.
This is now ready.
Simple way to do it is that smell.
We're just gonna fill the rest of the container with milk.
>>Milk?
Can it be any kind of milk or does it have to be dairy milk or- >>Yeah, you can use any kind of milk.
The type that you use, the type that's on sale, the type that's cheap, it's all good.
>>So coconut milk, oat milk, almond milk?
>>Coconut, oat, almond, yep, if you don't wanna do the animal thing, or if you just like good old cow milk, that works just as fine.
>>That's fine, too.
>>And what'll happen is we would fill this on up and get about 3/4 full, leaving a headspace.
And now I wanna cover it again.
>>Okay.
>>This time when we cover it, we can just set it in a corner or dark cupboard or anywhere like that.
And what's happening this time, because we already collected microbes in the gray water, now the milk is such a highly nutritious environment that the microbes are gonna proliferate and grow even more.
>>Excellent.
>>Yeah, right.
So then what happens is over about four to six days, and you'll watch this, this milk will now start separating.
It'll turn solid.
And if you could zoom maybe in here, this one, it started a couple days ago.
You can see a couple of the solids are really starting to separate.
>>Yeah, you can almost see 'em right there.
>>Yeah.
>>Yep.
>>And what'll happen is this'll separate to the point where now you'll have this whey and your solids will be part of this.
>>So you remove the solids.
>>Yes.
>>And keep the whey?
>>That's right.
>>Okay.
>>You remove your solids and you can toss them into your worm bin or compost.
>>Excellent.
>>They're highly nutritious.
Yeah, why not?
And then you wanna use a siphon.
I like the siphon.
You can pour it off, but you get a little bit of the waste in there, and I want it clean.
So if you take a hose and kinda put it down in there and you can siphon it off, it'll give you a much cleaner LAB.
And this one is complete.
Once we have this in our hands, this is a great tool.
This is a excellent tool for natural farming.
>>Excellent.
>>And we can take that and now we can ferment things.
>>Well, let's go to that step.
(Marco laughs) Pass me that milk.
(laughs) >>All right, there's the milk.
>>Okay.
>>And so when we ferment, like I said, this is our main ingredient, this is loaded with microbiology.
And when you smell it, it's got a little bit of a cheesy smell to it, if you will.
And so now to ferment something- >>I'm just gonna put this over here.
>>Okay.
To ferment, this bottle is half plant, and then fill the rest with water, leaving a headspace.
But to get it to ferment, to start that fermentation process, now we need some of this.
>>You need some of this.
>>Sorry.
>>We need this, which is the microbes, and we need this, which is the food, sugar.
>>So how much of that do you put in for a half a gallon like we have there?
>>My ratio is per one gallon will be a cup for a gallon.
So if you're doing a half gallon, you go half a cup of LAB, half a cup of sugar.
And then cover that with an airlock, which basically is gonna let your air out and no gases come in.
The microbes create some gases when they're fermenting and doing that.
So you wanna have that airlock.
You can use a rubber glove with a rubber band, works as well.
And basically, you're just gonna put that sugar and that LAB into this vessel and put your airlock on it.
And over the course of about 21 days, the microbes will consume the sugar and the plant material that's in here.
And they'll end up creating basically amino acids, which are plant available nutrients.
>>Fantastic.
>>So now we have elderberry, the nutrients of the elderberry, the microbes, which are in the LAB.
And now when those go into our soil, it's readily available to our plants.
And the microbes in the soil consume the LAB and/or, you know, if they're not consumed, they're being consumed, one or the other.
>>Yes, that is fantastic.
How much do you pour on your soil?
I mean, you've got microbes in there, it's microscopic.
How much do you pour around in your garden?
>>A good ratio when you're talking about, if you're gonna use LAB, if you wanna use it by itself, you can use 1 to 1,000.
It's very strong.
So you basically one teaspoon per gallon.
>>Wow.
>>And maybe a little bit more.
LAB is very powerful.
It will outcompete a lot of the other microbes.
So you wanna use it sparingly in your soil.
All these ferments, you wanna use 'em somewhat sparingly because less is more, really, when you're talking about farming and gardening.
>>Gentle nudges.
>>More usually gets you in trouble, you know what I mean?
>>Yeah, very gentle, gentle nudges.
>>Yes.
>>Well, Marco, I thank you so much for introducing us to a new way to introduce microbes to our soil.
>>You're welcome.
>>This is fascinating.
And it's something we all have the products for and we all can do.
>>Yes.
>>So thank you.
>>You're welcome.
>>Yes.
And now we're going to head over to answer your questions.
But first, Jen Naylor shares gardening wisdom she learned from her grandmother and how to use a traditional Korean farming tool.
(light music) >>When I was growing up in Korea, I used to go and visit my grandmother's farm every summer and just pick a watermelon from the field and crack it open and just shove it in my face.
It was the most delicious thing I have ever, ever tasted.
Anyway, what my grandmother used to talk about is that you have to really respect the soil to a point where everything that lives underneath the soil is a life, and you have to protect that.
So whatever you take away from that soil, you have to replenish it.
And several ways you can do that is not to till.
Do not disturb.
And you can rotate the crops.
Tomatoes, for instance, would take away lot of that nitrogen or phosphorus and whatnot.
So next time, on top of the soil that grew tomatoes, you can actually plant beans, and the beans would actually put in the nitrogen and phosphorus to the soil so that next time you grow something that needs that sort of nutrients, you can do that.
Now what I do here is actually I raise chickens, and chicken manure is one of the best source of putting back the nutrients that you took from soil.
You always wanna go and use the aged chicken manure.
And this is about six months to a year old.
So what I do is once I prep the soil, take away all the weeds and the plants that was growing, I take some... Look at this beautiful, beautiful compost.
And I just sprinkle on top about a quarter of an inch to a half an inch almost.
Now, what my grandmother used to do is she used to use this hand tool.
It's called in Korean, homi.
And so she would just go gently, gently mix in the compost into the soil without tilling or digging, and it just makes the soil so happy.
And when you're ready to go ahead and plant things, you just go ahead and using the pointy end and just like dig a little hole and then just go ahead and plant the seeds or transplant whatever you need to transplant.
This thing is just absolutely amazing.
I have a little itty-bitty farm, but imagine my grandmother used to just have acres, acres, and this tool (chuckles) is basically all she used.
So if we can stick with the traditional way which farming has been done for many, many, many, many years, we can really preserve the soil that we take away nutrients from.
Healthy soil is healthy life for us.
So the three things I practice in my farming is no tilling, that I do not disturb the soil, and the second thing is I rotate the crops, and the third is use the high-quality organic compost.
When you use those three techniques, you just can't go wrong.
You'll be able to go ahead and grow beautiful, beautiful plants and food for your health.
(bird squawking) And you should try it.
>>Members of our team are on Facebook to answer your questions.
You can submit your questions there or through our website, vpm.org/vhg.
And today we have Shana Williams with us to help answer your questions as well.
Welcome, Shana.
>>Thank you.
>>Where do we start?
Do you have some more questions for Marco?
>>Yes, actually, Marco, I wanted to know if I can make larger quantities of it, maybe a five-gallon container or something like that, or even a 50-gallon container, stored it up and share with other people.
So what would that process look like?
>>Yeah, that's a great question.
That process would be very similar, and that's one reason we like to use ratios instead of exact amounts because then we can kind of, if you got a larger vessel, you still do that 1/8 ratio for the LAB part of it.
From there, it's just all about scaling up.
So it's the same process, just a bigger vessel.
So it's really easy to scale up.
>>And I can use, oh.
>>I was gonna say, you start with one... 1/8 is from the, let's call it starch water, be it from the rice or be it from the pasta.
And then when it's time, you fill that 3/4 full, the container to 3/4 full with the milk or milk product that you're using.
>>Right, but just remember that LAB is so powerful that that small jar that we just made can ferment a 50-gallon drum.
So you wouldn't wanna make 50 gallons of LAB, you would only wanna still make a gallon of LAB, and then that can still be that one cup per gallon that goes into your 50 gallons.
So you can kinda scale it up.
That's the thing about the microbes.
They wanna grow and they wanna reproduce.
So it's easy once you get 'em going.
>>Oh, that's perfect.
And I can see people wanting to use the LAB by itself and just shortening the process and just-- >>And you can do that.
>>Adding that to the order.
>>In natural farming, LAB is considered like the police, meaning it provides order in your soil.
So if you have a soil that's a little bit out of balance, when you get LAB in there, it can out compete a lot of things, soften your soil a little bit, and make it a little bit easier to work with.
For the same reasons though, you don't wanna overdo it because now your soil can get out of balance, it'll change your pH if you have too much LAB.
Yeah, it'll make it really acidic.
>>And that's one of those questions is like, how often should I do it?
Once a week, once a month?
>>Once a season?
>>Yeah, LAB is something I like to use maybe once a season or every other month at the most.
Just depends on what's going on.
For the most part, I really like to use it just to ferment different things because now I'll not only get the LAB component, I get that plant.
And a lot of plants I grow are dynamic accumulators, things like comfrey and nettle.
So those are things that I really like to ferment 'cause they do really well.
>>Are there other plants that are more, I'll say enriching to the soil with the LAB besides comfrey and nettle?
>>Those are two good ones.
One of the biggest things with LAB is it's really good to use with compost tea.
So like compost tea.
So when you have that compost tea combined with LAB, it really kind of kicks it up a lot.
Yeah, so it makes it really nice.
>>Powerhouse.
>>Yes.
>>Are there certain plants you shouldn't put into ferment, excluding poison ivy?
I mean, the obvious, okay?
>>The obvious one.
You know, for the most part, most plants are okay to do.
You just wanna use a little bit that common sense, and it's about more of where you harvest the plants from.
Like, I'd rather grow the plants near my property than I would to say collect from a roadside for obvious reasons.
We just wanna have a little more control over that.
But most plants are fair game and I always say use what's available to you, and that's the most important thing.
Look around your garden.
There may be things that you consider weeds.
They may be weeds in a technical sense, but they'll be great for ferment, and they'll be great to feed back to your soil.
>>I was just thinking also some of the expired vegetables or wouldn't wanna give to someone, can't give 'em to the chickens all the time.
>>True, true.
>>I can just go ahead and ferment them.
>>That's right, and yeah, fermenting is great for that.
And once it's fermented, the shelf life goes really long.
So it can take foods that are going bad, ferment them and now you can have a viable source of feed to your animals and they're still good.
>>Well, how small do you cut up the vegetables for fermenting?
Do you cut them into like half-inch cubes or you know, approximately?
>>Yeah, half inch is about right.
The smaller the better.
But because you got that osmotic effect in fermentation, so whatever size they are, it's kind of gonna pull that moisture out of that plant, and that nutrient out of that plant anyway.
Obviously, you wouldn't wanna put whole apples in there.
You can chop 'em up, but even if you put whole apples in a ferment, it will still ferment.
You know what I mean?
Over time.
>>Take longer.
Yeah.
>>So yeah.
>>Well, I do have a question.
Someone said, let's see, "When you are starting a ferment, is it bad to leave it in the jar for too long?"
>>What'll happen is it's not bad, but what'll happen is it could go to vinegar on you, which is a good... That's another input.
I love doing vinegars.
Like just the same way we did that ferment, we can do a vinegar even easier by adding a splash of raw vinegar instead of the LAB.
Now you have acetic acid bacteria instead of the lactobacillus bacteria.
And so going too long it, it's not bad, but it could just take you from going, you know, you wanted a LAB ferment, now you're kind of going to vinegar, and it just changes the biology possibly, but it's not a bad thing.
>>Okay, do I need to check my soil once I put it in there just to see if it becomes more acidic versus alkaline?
>>No, because you're gonna use those lower ratios.
>>Yes.
That's key.
>>We're all on that low ratio, and so that way, that's built in so that you can't kind of throw your soil out of balance.
You're at that 1-to-1,000, starting there, observing.
>>Real easy.
Yeah.
>>Oh, it took that really well.
Well, next week maybe or the next time you water, well, maybe we'll go up a little bit.
LAB is also good as a foliar spray.
We were talking about blight, that's always a thing.
There's some writings that say LAB can keep fungi at bay for about two weeks.
So if you're foliar spraying it, it can be beneficial to you that way as well.
>>Okay.
Well, I do have one of the questions that someone asked earlier, and I wanted to address it.
So David from Varina asked, he has an asparagus bed, and he has some raspberries that are starting to run into his bed and take over.
(all laughing) Well, one of the things he wanted to know is when should he uproot it and change the crowns?
Should it be stored?
Should he do it in the fall?
Let the tops die back, or should you just leave them there over winter, and then transplant them on the new shoots in early spring?
>>I would do it in the spring time because I wouldn't want those roots to be disturbed.
And then, gosh, we have a harsh winter, and those become their own separate entity of coldness and possible ice.
So I would do all this in the early spring, and I mean March, early spring.
>>Definitely.
>>That's when I would do it.
So we got time for just a real short one.
>>Okay, so Nancy from Staunton: "Are there some plants that you shouldn't use this process on?"
>>Yeah, we kind of mentioned that.
It would be ones that...
It would be more kind of where they're grown I think is more than anything.
You like a good leafy plant.
You like plants that are nutritious.
Like, I brought the elderberries, they're a superfood.
I always look for those kind of plants.
And they can come in many packages.
They can be as small as a weed.
You may have a whole field of weeds.
Now you can take those and do the same way.
But the plants are just common sense.
If it's poison, oak poison, no.
Giant hogweed, no.
Those kind of things that we know are bad but for the most part, 90-something percent of what you see around your property is very viable to use for these inputs.
>>Yeah, and if I'm just feeding the soil, not really necessarily spraying it onto my plants, I shouldn't have to worry about it at all either.
>>Correct.
Yeah.
If you're definitely feeding the soil, we got so many microbes in there, and that soil food web will really do a number on that.
So I wouldn't be concerned.
>>Wonderful, well, this has been great, and that's all the time we have right now, but we look forward to answering more questions later in the show, so keep them coming.
And Marco, thanks for joining us, and sharing your passion for ferments.
And as you know, I'm in the process of starting my own.
I'm on phase two, so I have to go home and start doing phase three.
I'm looking forward to it.
>>All right, thank you.
>>You're welcome.
>>All right.
>>And next, Amyrose Foll visited Mechanicsville to talk with Mark Davis at Real Roots Organic Systems about how he uses regenerative practices while growing tomatoes, and how he makes his own worm compost.
Let's take a look.
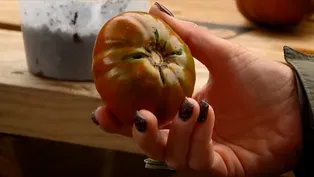
>>About three years ago we transitioned to all heirloom tomatoes, so we've got some big slicer heirloom tomatoes, we've got cherry tomatoes, and a little bit of mixing in of other types of food that I kind of just grow for myself to eat.
(Mark laughs) >>Where does the food go?
>>We sell to a couple different outlets, so we have a wholesale account and like grocery store.
We sell to the Ellwood Thompson's here in- >>Oh.
>>Richmond, which is pretty cool.
>>Yeah.
>>They've always supported us over the years, which has been awesome.
Also to the north side, Food Access Coalition.
My friend Duron has a black farmer CSA that he sources from black farmers around the city, so I sell into his- >>Oh, wonderful.
>>His CSA as well.
>>And that's keeping the food miles really short, so that's good.
>>Exactly.
>>Can you talk a little bit about the value of keeping your food miles short and local?
>>Oh, definitely.
I think that from what I understand, eating food from around where you are is even more impactful than maybe buying organic food or buying exotic food from different parts of the world.
We got plenty of exotic stuff from right here, which is fun to help people learn and educate people about, but yeah, I think nutrient wise even, how short that time is in between the harvest and when you eat it, is so significant in how your body takes up those nutrients and those minerals, so I think not even just for the sort of future local economy aspect of buying from around, I think there's even a nutritional aspect that- >>Yeah.
>>Supports that kind of- >>Almost like you're stewarding people's bodies as well.
>>Yeah.
>>So- >>Farmer always has.
>>So this is a regenerative farm and to me that means high-quality inputs.
Can you tell me a little bit about your systems that you have in place here?
>>I think the main thing that we practice is extremely low disturbance in the soil, so we try to keep the soil as moist as possible.
We try to keep it covered as often as possible, whether that be some tarps and plastic things that people have seen, or different organic mulches, wood chips, leaves.
We're here in a beautiful deciduous forest, so there's no shortage of leaves at all, and then most importantly, is the low tillage aspect.
The way I like to think about it is if you were a chef and you were in a kitchen and somebody came in at the end of your shift every night and just destroyed everything in the kitchen, opened up all your cabinets, knocked everything out, it'd be pretty hard for you to pick up where you left off the next morning.
>>Absolutely.
>>The soil is very, very similar, so if you come in there and just completely disturb everything at the end of each season or year, then it takes a while for the organisms to recover and then therefore the plants to be able to feed themselves, so first and foremost, the soil, we keep it protected, covered, and treat it like it's a living thing itself, which it is.
>>You have a really unique vermiculture system here.
Can you tell me a little bit about where you get your worms from?
>>I actually harvest the worms in a way, directly from the native soil, so I will set up a small area, like cinder blocks kind of thing, real cheap setup, nothing fancy, and then I will literally feed (giggles) the ground with fruit pulp.
I'll dump those bad boys right in the open pit and then cover it up with a black tarp and basically wait, and after about a month or two, a lot of the native red worms will come to the surface to work that down and I'll just grab some handfuls of 'em- >>I love it.
That's genius.
>>Take 'em to the (laughs) to the hut and go to the next level from there.
>>So what's the next step in that process?
>>So after that, after I, I guess, I dunno, breed, harvest, collect the worms, I will have a area that I just do typical compost, a typical thermo composting, and then I will take that compost and add it to a second system, which is like an above-ground system that you can harvest from the bottom.
I'll add the regular compost in, I'll feed it with a different set of inputs, I'll add different rock dust, basalt, azomite, things like that to add the micronutrients, I'll add the worms' food source, so maybe more coffee grinds, something really dense, high nitrogen content, for the worms to eat, and then right over the top, I'll add the worms in, and then right over the top, I'll sprinkle like little oats 'cause worms like oats a lot and that helps 'em breed and reproduce.
>>That's really interesting.
>>Yeah, yeah.
>>I did not know that.
>>Yeah, they like oats.
>>Oh my gosh.
>>I dunno, I think it's that crude protein kinda thing.
>>Having grown before and after, how impactful do you think that is for your final product and your harvest?
>>Oh, it's huge.
It's basically the only input that I use.
I don't use synthetic fertilizers.
Even things off of the like OMRI lists that are technically organic, I still try to steer away from, not because they're bad or anything, but I've just noticed with the vermicompost that we make on site, using it at the transplant stage and then using it nice big handful in the hole when the tomatoes are planted, and then as an extract, a liquid extract throughout the season, between those three feeds, I've never really had a mineral issue or deficiency in the plant at all.
>>That's really amazing.
>>Yeah, yeah.
It's fine.
>>These are beautiful too.
>>Yeah, yeah, yeah.
>>Is this one of the heritage varieties that you grow?
>>That is, yeah.
So that's the Paul Robeson heirloom tomato there.
That's the Paul Robeson variety.
>>So, it's gorgeous and it's nice and firm too.
>>Yeah, which helps, 'cause normally heirlooms are finicky (laughs).
>>So what's your favorite thing to grow here?
>>I would say probably the slicer heirloom tomatoes.
Just like the validation of a one-pound tomato after you've worked for six months and all, doing a little bit of this, a little bit of that over an entire year, and then my grandma would eat 'em like a apple, you know what I'm saying?
So I pick it off.
You don't even really need the salt.
If you do it right, you don't really even need the salt, but it does, it's nice.
>>Yeah.
>>A little bit on there.
Boom.
Just what a feeling.
>>That is amazing.
(Mark laughs) It's so satisfying and it's beautiful that you're sharing it with the community too.
>>Yeah, there's a big aspect of the mutual aid that we have going on here as well, so just on the land in, a little bit about the land in general, we have a collaborative agreement, so I do share the land with a couple different businesses, but we have a area that we specifically dedicate to donation to the church that owns the land and their food pantry, and then different mutual aid outlets throughout the city as well, so we're just trying to show that even alongside a business and production, there can also be, and should also be, a community-based element where we know the food is free, it's supposed to be free, it's our birthright after all, so the closer we can get to that with every step, the better, you know?
>>That is beautiful.
>>So keeping that, keeping the free food close, not just 'cause we are not a charity, you know?
It's a little different, but keeping the reminder that the fact that we have to charge for this is a creation.
>>Yeah.
>>You know?
That's not the natural way, but we're getting there.
>>This is a really beautiful local farm and you have done an amazing job, and your whole mission and how you do what you do is something that people should aspire to, so thank you so much for having us out today.
>>Yeah, I appreciate y'all giving me a little moment to zoom in on some things.
>>Thank you.
>>It's been awesome.
Yeah.
>>Harvesting lush tomatoes or even beautiful flowers is one of the outcomes of healthy soil, proving the saying, healthy soil equals healthy plants.
Today we're learning to go beyond beauty to a new saying, healthy nutrient-rich soil teeming with microbes equal healthy plants growing nutrient-rich produce.
And now Mark is here with us to talk more about vermicomposting and to demonstrate how to make vermicompost extract for the soil.
But before we begin, remember to send in your questions through our website at vpm.org/vhg, or through Facebook.
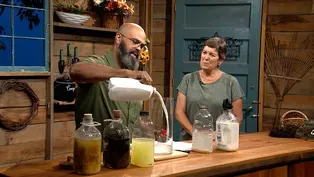
Well, Mark, you've got wonderful stuff here.
(laughs) >>Thank you, thank you.
>>I don't know whether to make breakfast or go plant in my garden.
(laughs) >>It's breakfast for something, I promise.
>>Well, share with me what it's breakfast for.
>>It is breakfast for worms, breakfast, lunch and dinner in most cases.
>>All righty.
>>What I do, I make vermicompost, and that's a compost that is a traditional compost with worms added to it to beef it up a little bit.
>>So really, what's the difference?
>>The main difference is that when you take compost through a traditional process, it has a certain set of microbes in it, and then when you add worms into it, they add another element of microbes, enzymes, and more complexity to the compost itself.
>>Sounds great.
>>So to get them to that point, I give them a certain set of foods that I add at different points throughout the process.
>>All righty.
>>One of those is coffee grounds- >>Oh, yes.
>>as one of their initial foods.
It's very dense in nitrogen and they like to just kind of churn that down.
It's pretty close to soil already, texture too, so blends in quite nicely.
And then they also do like a starchy product, which is, for me, different people use different things, but I use oats.
>>Okay.
>>So I've got two different types of oats here.
>>Okay, and which one do you prefer, do you use them at the same time?
>>I do use them at the same time, yep.
I use an oat flour together with the rolled oats so that it can start breaking down quickly, and then the larger oats can feed a little bit slower over time.
>>Excellent, and then these are the outputs?
>>Yes.
>>And what's the difference between these folks?
>>These here are the two outputs of what I create on the farm.
So this one here is a three to four month process.
>>Oh, that's beautiful, yes.
>>And it's mostly a traditional compost with the worms in it for about a month or two.
And then this one is a much longer 380 day process, a particular process called the Johnson-Su method, and that takes a little bit more than a full year and ends up with a whole different host of microbes in it as well.
>>And the goal is microbes?
>>The goal is microbes, yep.
and those microbes that we create, we apply directly to the soil via a extract that I make with this here bag.
>>So how do you make that extract?
>>Yeah, so I basically take a mesh bag of some sort.
This is a pretty professional type of bag, but you could use cheesecloth, you could use pretty much anything with the holes smaller than the soil itself.
>>Okay.
>>Right?
>>You could even use a laundry bag.
>>Absolutely, yeah, whatever you got at home.
And I will take a predetermined amount, but a healthy amount, usually a handful or two, of whichever compost that I'm using, and I will- >>Put it into the bag.
>>Put it into the bag.
Right, we'll use quite a bit.
>>Be generous.
>>Yeah, yeah.
Oh, yeah, we don't need to take this with us, huh?
(laughs) So we'll fill that up and- >>Here we go.
I'm gonna move this one over here.
>>And you kind of see it there in the bag, ready to go.
We'll close the bag at the top.
That's how we do it here.
And then whatever kind of bucket that you have available to you in your garden or in your backyard, we fill that with unchlorinated water.
>>Okay.
>>It is important that the water is not chlorinated for, we don't want to kill the things that we're creating.
>>Oh, golly, no.
Yes.
>>Not at all.
And we will take the mesh bag here and suspend it in the water and basically massage, gently massage the soil itself into the water.
>>Okay.
>>And what that does is remove the biology itself and suspend it into the water, and what we have, you can't see it 'cause it's a black bucket- >>Right.
>>but I'll show it.
I'll show it right here for you.
We have a different product at the end.
>>Is this wonderful extract.
>>Which is a great extract full of the same microbes that you created in the compost, via liquid.
>>So that's extremely dense?
>>Yes.
>>How do you apply it?
Do you put it into a sprayer and spray it over with water, or?
>>You can apply it in multiple ways.
So I choose to apply directly to soil and ideally to living roots that are already established in the ground.
So if you're in a farming context, that could be a cover crop, but if you're just in and out your garden, whatever you got already growing.
>>Sounds great.
>>But you can also add sugar to it and make an actual compost tea, not the type to drink.
>>Not to drink.
(laughs) >>No, but the type to spray to the leaves, a foliar application.
There's lots of places that you can go from here, but typically I just apply straight to the soil.
>>Right, real quick, 'cause we have seconds.
>>Sure.
>>How often, once a season, once a week, once a month?
>>As often as you have living roots that have been established for about three or four weeks.
So if you're a farmer and you got a couple seasons, you can do a couple times a season, if you just got big old rose bushes, maybe once or twice a year, but it's just generally if there's living roots, then it's never too much.
>>Excellent.
This is wonderful, thank you so much.
>>No, of course.
>>And next, we're going to answer more of your questions, but first, Randy Battle shares tips for getting fall seedlings started.
Summer may be about to end, but there is still time to grow radishes, lettuce, and the cole crops.
(upbeat music) >>As the summer ends and fall fast approaches, now is a good time to think about what you're going to do with your fall garden.
One of my favorite things about fall gardening is it's much cooler.
It's less work, rather than your summer garden where you have to go out and prune a lot and do a lot of things.
Fall garden, you can just plant things and let them grow, such as your beets, your radishes, your carrots.
There are a ton of things that you can grow in the fall, so let's just get started.
One of the first things I like to consider when starting my fall garden is the soil conditions.
Whether you're a new gardener or an experienced gardener, you always want to make sure you have some good soil.
I take a little bit of my old and I mix it with the new, and it comes out just the way I like it.
And it also stretches your soil so you have more soil for less money.
We're on a budget, don't forget.
Second of all, check your first frost date.
That's the date where the ground starts to freeze up at night, the temperatures reach in the 30s and below.
So you want to make sure you have your seeds started well in advance before your first frost date.
If you don't know when that is, just look it up on the internet.
Type in your city and state and ask, "When is my first frost date?"
and it will tell you.
And you want to plant your seeds accordingly.
So today what we're going to do, we're going to start off by planting some seeds.
Whether you're using cups, containers, take what you have and make it work.
Okay?
So I'm going to fill this up, and this is my mixture of old and new soil.
(dirt crunching) It doesn't have to be rocket science, you guys.
Make it fun.
Get the kids involved.
Get your family and friends over.
(shovel knocking) So once you get your soil all nice in there, give it a little shake, a pressing, not a packing.
You don't want to over compress it because your water won't seep through.
(container crinkling) And then I water it a little bit, (water can clicking) just like so.
So the seeds already have a moisture base just like that.
And now we're going to plant the seeds.
We're going to start off with some radish.
And I always plant two to three per cell, so we're not waiting on plants to grow that are not going to grow.
Okay?
You can also direct sow these in the ground.
But if you're growing in an apartment or in a small space, you can grow these in containers as well.
Then you will put a thin layer (container crinkling) over top, just like so, and just give it a little tap, (fingers tapping) just like that.
Now what I'm going to do is use my seed tray to start several varieties of these.
So I'm going to put that one there, and then I'm going to start another one.
I'm going to plant lettuce.
I'm going to plant some beets.
And I'm even going to plant some beans for my fall garden.
So remember, starting your fall garden can be fun, easy, and you can do it.
>>As Randy shares, it's not too late to plant a fall garden.
I just planted broccoli, lettuce, carrots, and zucchini.
And in November I'll plant my garlic.
And now Mark, Shana and I are here for another round of your questions, so let's see what we have.
But being honest, before I get started with these, you had a myth buster to share, Mark, and I wanted you to share that.
>>A small one, a little bit of one, yeah.
But just that people think about what to feed worms a lot.
And there's a few things that people think that worms don't eat, that you can't.
Things like onions, things like lemon peels, orange peels.
And I would just like to say worms definitely eat all of those things.
But the why it seems as though they don't is because some things have properties that make them a little bit resistant to decomposition.
So it's not that the worms don't eat them, it's just that the worms choose and select to eat other things first.
So when you look into your bin, it looks as though they left all the onions, they left all the lemon peels, but really they're highly intelligent and they just leave these things to break down a little bit more before they get to them.
>>Excellent, that's interesting >>You can put it all in.
>>I wish I'd known that when I was a kid.
I would've used it on the Lima beans.
>>Oh yeah, it's not too late.
(cast laughing) >>I'm waiting for him to break down, mom.
>>Break down, right.
Use science as the reason.
>>Thank you for busting that myth.
'cause yes, there's so much out there on the internet and it's so hard to know what's fact and what's fiction.
>>It can be.
>>So thank you.
And then we had another question is after you've rung out that compost, and you pulled out that extract, you can still use that compost in your garden?
>>Sure, yes, definitely.
>>Those worms have worked too hard.
>>They worked really hard and a lot of times I'll put it right back into the pile that I pulled it from.
So you can let it get repopulated by the microbes and use it again in a little while or in the case of the production farm, like the one that I have, I'll put that into the holes that I plant the transplants themselves into to be more of a slow feeder.
>>Do you do any top dressing with it?
You know, if you have a lot just layered on top and just let the rain just soak it into the soil.
>>You can, I would say that makes a little bit more sense in a smaller garden, I would think.
The worm compost is really concentrated.
>>Yes.
>>So for an acre or two acre operation, that'd be a lot of worm compost.
So you don't need to have a top dress... A full... As if you were using traditional compost, just a little bit.
So I find that it's more helpful to put it in the holes at planting.
And then ultimately the liquid application makes it so easy to have a small amount cover, cover a larger space.
So if you were in a backyard garden or something and you made like a nice big pile or a nice big bin of worm compost, you could totally put it right over the top, put some leaves on it to keep it moist.
>>Because I was thinking when your demonstration and you had like the brick and how you make your own and how it breaks it down over time, I was thinking, hey, do you pull those worms out and take it into a fresh area and take all that soil and just spread it out in your garden and then just give them a nice new bed of fresh compost to chew on?
>>I definitely, I'll take the worms out because I use them in rotation over and over.
So I will sift it, I'll sift all the worms out.
It's kind of chaotic for them.
But I'll sift the worms out, use the final product and then I'll put the worms back into their bin just to keep going.
But you could put it on the bed.
And a lot of times having a few worms fall through into the bed themselves so they can keep working on the leaf matter or your mulch if you use organic mulch, having some worms in the bed doesn't hurt either >>Actually it's perfect.
>>Not at all.
>>Aerated the soil.
Add some poop to it.
>>Well, Ruth from Ashland has asked, are there earthworms good... Are all earthworms good or are some not good for vermiculture?
Also, is the process the same for all worms?
>>For all worms?
I'm gonna go on record saying all worms are good.
(cast chuckling) But I would say some are better for composting than others.
There are particular types of worms that serve different jobs in nature, not to overcomplicate it, but to keep it simple, there's a surface dwelling worm and there are burrowing style worms.
Typically the burrowing worms that are bigger fatter earthworms that we all kind of understand as fishing worms, you know, but the surface dwellers are your best composting worms because they're used to staying on the very top six inches of the soil layer and just churning and cycling all of the things that break down.
So there are particular worms that are better suited for creating compost.
Red wigglers.
>>What I was gonna say.
>>Is typically that's kind of our, the red worm standard kind of classic composting worm.
But all worms will eat, it'll just be slower, different, and they need different conditions.
>>Yes.
Well, speaking of conditions we've had quite a summer and we have a number of questions regarding the heat and what it's done to their gardens.
Like we have David from Varina, sorry, wrong one.
We did that.
We have Flora from Berryville has asked, you know, her yellow squash, she put in the seeds in early June in a corner and beautiful plants and blossoms, but no squash.
And she wanted to know what happened.
And I don't think people realize that when it gets too hot, the squash flowers really... >>They drop.
>>Yeah.
They just drop and they don't pollinate.
And there's also a gentleman in here that was asking, "My crop has failed".
You know, they've had always had a thriving vegetable garden and they've had some unusual...
Vegetables have died, even their liriope died.
And what have you all experienced with your gardens with this high heat?
>>I mean, it's been so wet.
And then at the same time, with the extreme heat that I find that, the tomatoes, especially if they're in the sun, I might get blight over here.
And then the tomatoes that's over here are thriving, but then at the same time, the rain and their plants and the fruit is splitting.
And so it's like that combination of, if I had some things in the shade, they seem to do well when they get part sun and part shade.
Those peppers and stuff like that they're producing really well.
>>Mine are in the part shade too.
>>Yeah, so I have to have that nice combination of the two.
Even my tomatoes, they're doing really well if they have that shade and sun.
>>Sounds great.
I'm just gonna add for the sake of time, another way to create shade is with row covers.
>>Yes.
>>You know, you don't have to have a tree.
You can do it with a row cover and break that right.
Sounds good.
Well folks, we're out of time.
And Mark, I wanna thank you so much for being with us.
>>Sure, yeah, thank you.
.
>>And Shana, I wanna thank you for being here and sharing your gardening knowledge.
>>You're welcome.
>>And I wanna thank you for watching.
We learned today that replacing the nutrients that our plants take from the soil is the key principle of regenerative growing.
And heard some great tips on how to do that.
And I do hope you try some of these methods at home.
You know, there's several ways for you to connect with us until we are back again.
You can sign up for our newsletter at VPM.org/vhg.
The team and I share tips and ideas for your garden there once a month.
Our Facebook page is also full of gardening information, so be sure to visit us there.
I look forward to being with you again soon.
And until then, remember, gardening is for everyone and we are all growing and learning together.
Happy Gardening.
(gentle music) >>Production funding for Virginia Home Grown is made possible by the Mary Roper Davis and Robert Poore Roper Memorial Fund.
And by.
(birds chirping) (gentle upbeat music) (electronic jingling)
Clippings: Regenerative Growing
Video has Closed Captions
Caring for garden soil creates healthy plants! (26m 46s)
Video has Closed Captions
Permanent garden beds reduce soil compaction (7m 50s)
Culturing Microbes for Garden Soil
Video has Closed Captions
Learn how to make lactic acid bacteria to add beneficial microbial life to your garden (6m 41s)
Video has Closed Captions
Get tips for starting seeds to grow in the fall garden (3m 11s)
Video has Closed Captions
Visit a production farm using regenerative growing practices (7m 57s)
Video has Closed Captions
Discover traditional Korean farming techniques to keep soil healthy (3m 5s)
Providing Support for PBS.org
Learn Moreabout PBS online sponsorship


Virginia Home Grown is a local public television program presented by VPM